Showing posts with label tactile play. Show all posts

Sunday, March 23, 2014

Back In The Game

Well I took a pretty long break there huh?!?

Things have changed around here. We added another addition to the family. A little boy :) He's 7 months old now and a pure joy!

Ive started to lead a class at a local kids gym called "Explore Our Senses". Each week I bring a new activity that elicits our senses in some way. It's a great opportunity for kids to explore, learn and work together while they play.

I thought it would be a nice for me to share some of what we do during the classes here on the blog and on my Pinterest page.

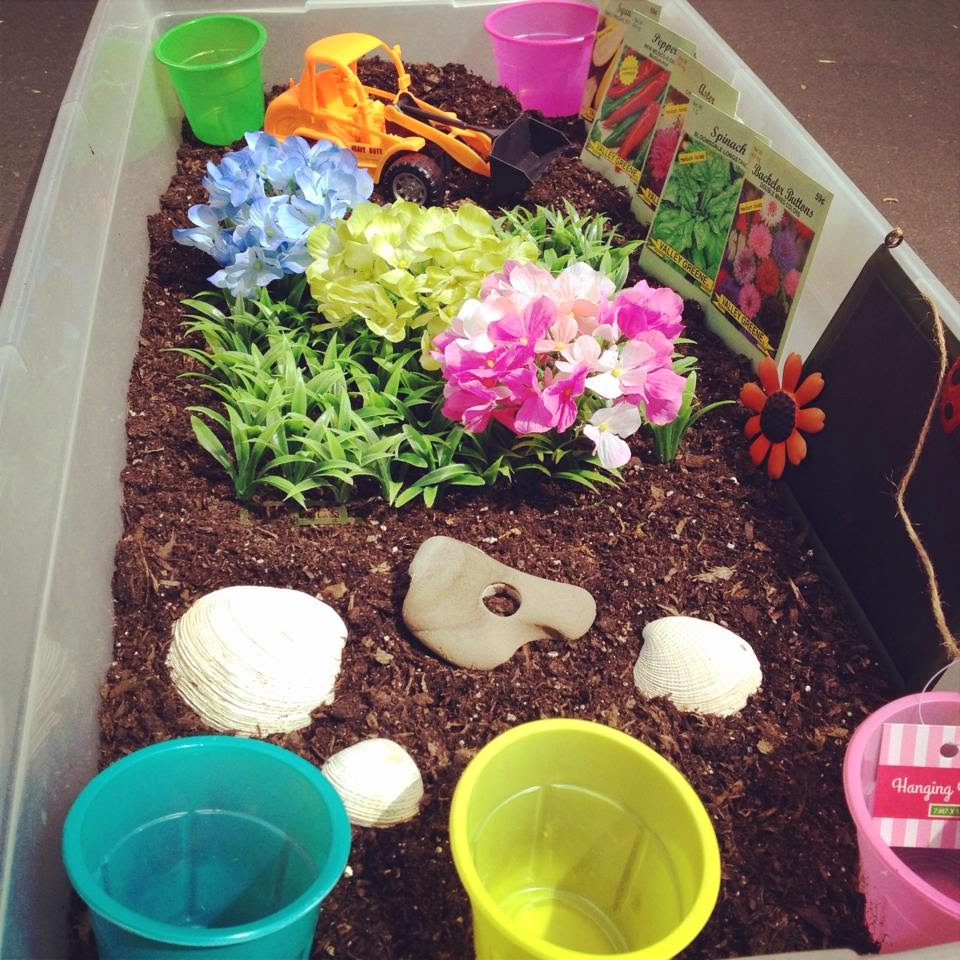
This week's theme was "Gardening".  I made a simple sensory box from items found at our local 99cent store. Spent a total of $8. The bin contained the follow items
  • potting soil
  • toy truck
  • fake grass
  • fake flowers
  • plastic cup set
  • seed packets 
  • rocks and shells from our local beach
  • shovels and rakes
  • plastic squirt bottle for watering our plants (awesome hand strengthening work too!)
  • ice cube trays for sorting seeds
  • big bowel for kids to scoop and pour into
  • rubber spiders, worms, lizards and frogs
     
Here is the blurb I wrote up for the parents. Enjoy!

"Working in the garden and out in nature is one of the easiest and most robust ways to engage our sensory systems. We incorporate all of our sensory receptors when we are out in nature. When children have the opportunity to interact with nature they connect with the Earth and their bodies in a very special way.

Digging and raking in dirt/sand is a great gross motor, fine motor and proprioceptive (sense of muscle and joint movement/pressure/positioning in space) activity. Through this, children work on hand and wrist strengthening as well as tactile discrimination when touching the different textures in soil. Children often find digging, scooping and pouring to be a calming activity and is a great activity to get children engaged and focused.

Today we explored a variety of seeds. Sorting seeds is a great fine motor and visual exercise for children. You can use containers or ice cube trays for children to sort their various objects in. You can plant these seeds in little paper cups, toilet paper rolls cut in half, half egg shell, a hollowed out lemon or orange half and watch it grow. These organic planters are biodegradable so you can transfer them into soil once the seedlings have sprouted. It’s a great learning opportunity for kids.

 Pouring water and using a garden hose can also be very therapeutic for kids. The weight of a water can or hose works on building muscle strength and gives little bodies great proprioceptive feedback which can be very calming. Watching and listening to running water can be calming and focusing. The smells elicited from wet soil, plants and flowers can be great fun for kids to explore.

You can make your own gardening sensory bin with items at the dollar store or your local gardening store. You can fill with dirt, sand or beans. Give your kids a rake, shovel, recycled containers and some water-they will have fun for days!

Saturday, October 6, 2012

$6 Autumn Sensory Bin

AAA the weather is getting crispy...football, pumpkin spice lattes, sweat shirts...Its beginning to feel like fall here in southern California (despite the random days when its 90+degrees still)

I wanted to make a fun Autumn themed sensory bin as a gift for our 3year old friend. I also wanted to make one for our daughter.

I hit up the Dollar Store for some ideas. They had some shoe box sized bins with lids which I used for the gift. But, we have a great container at home for ours. Here is a picture of the supplies I bought costing in total $6
Wood chips, a small wreath, a bundle of leave, a pot of sunflower, a small pot of pumpkins/squash/pine cones, some kind of decorative branch thing (no idea what this is).

I used wire clippers to cut off the flowers, leaves, small pine cones, pumpkins and squash. I dumped the wood chips in and spread around the loot.


You can add things you find on nature walks to the bin over the next few weeks. We added two large pine cones!

These things are so great for young children. Its a way for them to explore things in nature learning about color, size, texture, weight, and smells (sometimes tastes).

Hope you enjoy!! Happy Autumn

Tuesday, September 18, 2012

Motivational PreWriting

I wanted to share a fun activity I've been doing with one of the kiddos I work with.

He's really into cars (as many kindergarten boys are) and he dislikes writing or practicing anything with pencil or paper (as many kindergarten boys do).

So, helping him with visual and fine motor skills for writing was a challenge. However, he loves chalk and pretending.

Chalk and chalkboards are an excellent tool to use for developing fine motor skills for writing. Having to maintain grasp on a small piece of chalk while pushing it across the board takes effort and helps build those little muscles in the fingers and hand. I recommend providing the child with broken pieces of chalk to work on increasing their pincher grasp. This will force them to use their finger tips vs using their fist or other compensatory strategies to avoid the effort of having to use their fingers.

Working on a vertical surface will help build shoulder strength but it may be more difficult for some children. So, do what works for your child or consult an occupational therapist for proper positioning techniques.

Here's the "game":
Start with a large chalkboard, chalkboard painted wall, butcher/poster page etc. Draw a person or animal on the left side of the board (dont judge my stick person).

Then, depending on your child's ability, make a "road" using curves or lines. If you're child is just starting out, draw the lines can be horizontal or vertical. Diagonal, curved and wavy lines are more challenging. The wider the road, the easier it is for the child.  At the end of the "road" draw a destination like a house (again, dont judge the art).
Have your child start on the left and use his chalk as a "car". Drawing inside the road from left to right. Here is an example of a narrative.

"Look, a giraffe! He's lost. Let's help him get back home using the magic road. Grab your chalk car and bring him home. Be careful not to fall off the road and don't go too fast or you could get a speeding ticket!!"

This is a great way to work on fine motor coordination and visual motor skills. Its teaching the child pre-writing movements necessary for letter formation. Its also working on fine motor control in order to keep that chalk car on the road! This will help the child write on the lines when the time comes.
You can also talk about how we start on the left and draw to the right. You can talk about top and bottom as well. These words (top, bottom, left, right) are important for understanding letter formation.

If you don't have a chalk board, try chalk outside on the concrete or crayons on paper. Using a white board isn't as effective because the dry erase markers slide across the board and don't give the same proprioceptive feedback to joints in the fingers as the resistance provided by chalk and crayons. Have fun with this activity, play around with story lines, use stickers in place of drawing if you aren't as "artistic" as I. ;) Enjoy!

Monday, September 10, 2012

Making ordinary play sensational!

One way you can provide some tactile input (touch sense) is to incorporate textures into everyday play experiences. Tactile stimulation is important for developing awareness and helps our bodies (hands in particular) discriminate differences in the way things feel. This is a foundation for more advanced fine motor skills to come. It starts in the womb when baby feels the umbilical cord or find their mouth with their thumb. Babies learn through touch...not only through their hands but their mouths. Their mouths send lots of information to their brains about the properties of objects. It also feels good to chew and suck which helps calm the nervous system. If you have a baby, offer lots of toys appropriate for chewing and toys with a variety of textures. Don't forget to play with temperatures too. We like to warm up a aromatherapy rice bear and cuddle with it. We also like to play with ice in bags or sealed cups. Allowing baby to self-feed or "play" with their food is so important. YES ITS A MESS. But, they are learning so much through touch, taste and smell.
This is my daughter at 6 months. She did not have teeth yet but I gave her a really cold carrot to suck and mouth on. She got to experience the taste and it helped relieve sore gums. If your baby has teeth and is this young you may want to try one of those mesh teethers to prevent choking on a hard cold carrot. She also painted with pea mash in this picture :)
This is finger painting with yogurt and a drop of food coloring. This was taken at 8 months and this is also when we discovered she had a dairy allergy. (minutes after this picture was taken she was covered in hives boo). We now use coconut milk blueberry and vanilla yogurt for food painting.

As you baby gets older and understands when you tell them not to put something in their mouth, you can start to introduce other objects. When my daughter was 11 months we pulled out the dried pasta and pinto beans. This was done under constant supervision and she did try to taste a few times but she quickly understood these things were for playing not eating. (i still watch her like a hawk). A fun way to encourage play is to present these things with familiar toys and containers.
If you do have a little one who likes to mouth a lot, I suggest giving them things they can chew on while playing. A pacifier or in my daughter's case, her beloved keys. We place the beans/rice in shallow plastic container and put a vinyl table cloth underneath which makes clean up so much easier. Give baby lots of containers and shovels.


Older kids like this as much as the younger ones but to step it up with them you can incorporate games into tactile play. For example, instead of just sitting to do a puzzle you could hide puzzle pieces in a box or bag or rice. Have them reach in to find a piece before putting it on the board. Here is an example of how we played the game Perfection with shapes hidden in a container of Flax seed. (would recommend rubbing hands with baby powder before this one because the seeds stick to sweaty hands)
Other things you can use in your tactile boxes: cotton balls, rice, beans, flax, water beads, pebbles, bird seed, flour, corn starch, oatmeal, pudding, wet pasta, dry pasta, and corn kernels. Really, anything you can think of!! Feel free to share your ideas here! :) or check out the Facebook page and share a picture of your little ones playing with their tactile boxes

Tuesday, September 4, 2012

DIY Sensory Board

I'm so excited to share with everyone how we made our sensory board. What is a sensory board you might ask?? It is basically a board in which you attach objects to be explored by ones own senses(typically the tactile or touch sense). You can make it as simple or complex as you wish. There is no right or wrong way to do it. You can tailor them to infants or curious older toddlers depending on what you place on the board. We started our sensory board when my daughter was around 6months. She was sitting up and really into touching soft things and LOVED ribbon! She is now 14 months and I've added a few things. I decided to use zipties so that I can change or remove things as needed. I didn't want to use tools and wanted to be as economical as possible. Here is what I used:

A peg board. This is 2ftx4ft and bought at Homedepot
Then, its up to your creativity for adding stuff. Since I wanted to do this as cheap as possible, I made a trip to our local Dollar Store. I also stopped at the Carpet Store to pick up free scraps of carpet.
In this picture we have a green car washing sponge, round adhesive mirror, carpet squares with super glued glass gems making a border, a white duster with the handle removed, a purple scrubbing sponge for dishes, a wooden xylophone with wand attached to the board by pipe cleaner.
In this picture I have pony beads laced on pipe cleaners. The pony beads can be moved up and down the pipe cleaner. I also hot glue gunned three mesh drain covers. These are fun to feel and can be squeezed by little fingers. I glued some fake grass from the carpet store and attached a twistable fake flower. I also attached a silk flower to compare textures. The round circular thing is a plastic lid I found laying around the house. I glued googly eyes on it for color recognition and to add a bumpy texture. I also added some fun beads to pull and feel. They make a cool noise when rubbed together.
In this part, I added a purple tambourine (which I should take off a ziptie so that it is easier to generate noise from). Blue square carpet in two color tones. A LED touch light (bought at Target around $5-my most expensive item). The orange adhesive feet are for the bottom of your bathtub...they are textured...kind rough/scratchy. I added three ropes which were very curly at first, I have hopes of teaching my daughter how to braid or tie a knot using these ;). We cant forget the CURLY RIBBON!! Lastly, three hooks which are attached with an adhesive backing. We use the hooks to hang various treasures on. I'm going to walk you through how to attach objects to your board:
You need zipties and an object. This is a recycled container from baby puff snacks. Perfect size for the board and easy to attach with zipties. I also have a fun feather duster I'm going to place in the container. My 14month old loves to put things into and out of containers lately.
First, come at the board from the back and lace the ziptie through one of the holes. If your container or object is large (as is the case with this) you will have to attached two zipties together in order for it to be secure.
Secure your object to the board using the ziptie. Connect and tighten from the back of the board
Make sure you pull the ziptie tight enough so that the object will not be pulled out by grabby hands (toddlers are freakishly strong). I like to trim the excess off the tie so the board lays flat against the wall or floor.
The above picture is of a recycled yogurt cup. Since it is wide, I poked two holes in the side and laced my ziptie through it that way. This is a fun little container for toddlers to place "treasures" inside.
Or, you can hide little treasures for your toddler to discover. Today I hid little plastic shapes inside. You can place a corresponding shape sorter next to your board and invite some shape sorting to happen :) I place my board next to a full length mirror and like to hang little things like sunglasses, bead necklaces, bangle bracelets, hats and puppets on the hooks for dress up and pretend play as well. SAFETY NOTE: infants and toddlers PULL so the best thing to do is to secure this to your wall or wedge a piece of furniture on either side to prevent it from falling down on top of them. Always use this with supervision. You can also play with this flat on the floor but your containers might get smashed if you have a walker or adventurous crawler.
HAVE FUN!!!

Sorry my close up photos are not facing the correct way...my computer is having some kind of glitch and wont save the rotated photos correctly :(