Sunday, March 23, 2014

Back In The Game

Well I took a pretty long break there huh?!?

Things have changed around here. We added another addition to the family. A little boy :) He's 7 months old now and a pure joy!

Ive started to lead a class at a local kids gym called "Explore Our Senses". Each week I bring a new activity that elicits our senses in some way. It's a great opportunity for kids to explore, learn and work together while they play.

I thought it would be a nice for me to share some of what we do during the classes here on the blog and on my Pinterest page.

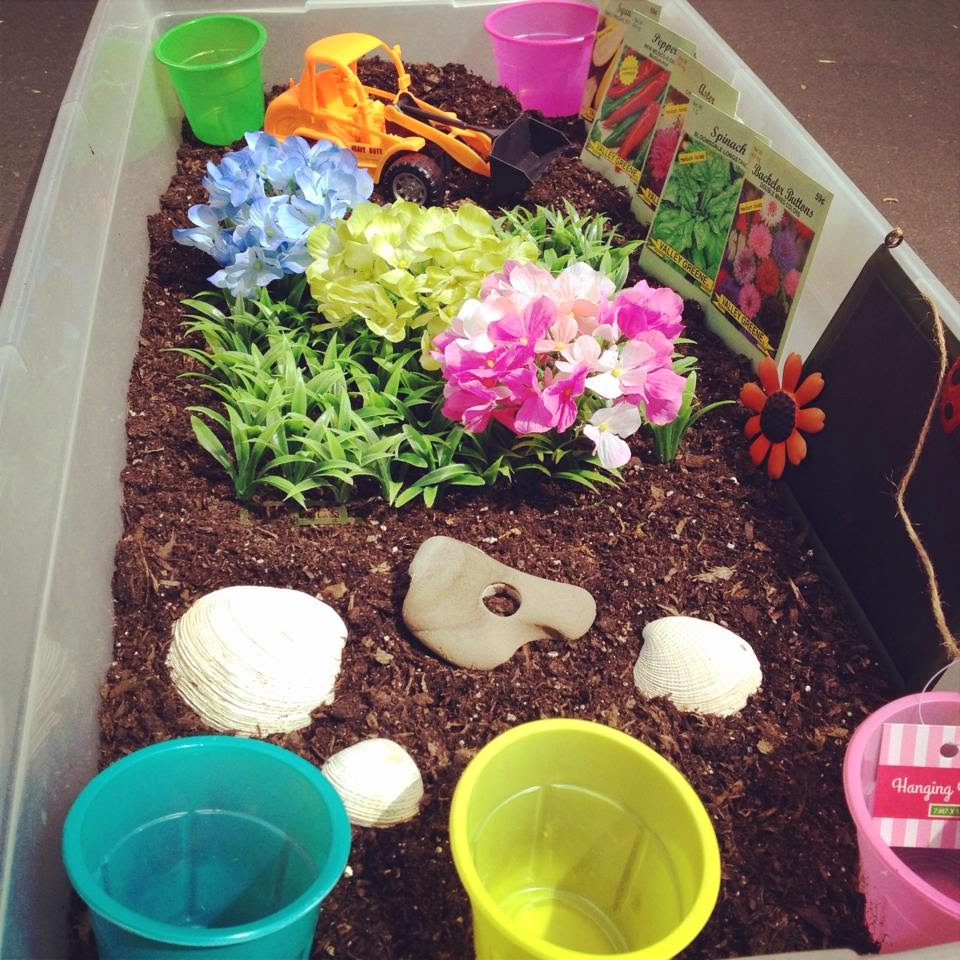
This week's theme was "Gardening".  I made a simple sensory box from items found at our local 99cent store. Spent a total of $8. The bin contained the follow items
  • potting soil
  • toy truck
  • fake grass
  • fake flowers
  • plastic cup set
  • seed packets 
  • rocks and shells from our local beach
  • shovels and rakes
  • plastic squirt bottle for watering our plants (awesome hand strengthening work too!)
  • ice cube trays for sorting seeds
  • big bowel for kids to scoop and pour into
  • rubber spiders, worms, lizards and frogs
     
Here is the blurb I wrote up for the parents. Enjoy!

"Working in the garden and out in nature is one of the easiest and most robust ways to engage our sensory systems. We incorporate all of our sensory receptors when we are out in nature. When children have the opportunity to interact with nature they connect with the Earth and their bodies in a very special way.

Digging and raking in dirt/sand is a great gross motor, fine motor and proprioceptive (sense of muscle and joint movement/pressure/positioning in space) activity. Through this, children work on hand and wrist strengthening as well as tactile discrimination when touching the different textures in soil. Children often find digging, scooping and pouring to be a calming activity and is a great activity to get children engaged and focused.

Today we explored a variety of seeds. Sorting seeds is a great fine motor and visual exercise for children. You can use containers or ice cube trays for children to sort their various objects in. You can plant these seeds in little paper cups, toilet paper rolls cut in half, half egg shell, a hollowed out lemon or orange half and watch it grow. These organic planters are biodegradable so you can transfer them into soil once the seedlings have sprouted. It’s a great learning opportunity for kids.

 Pouring water and using a garden hose can also be very therapeutic for kids. The weight of a water can or hose works on building muscle strength and gives little bodies great proprioceptive feedback which can be very calming. Watching and listening to running water can be calming and focusing. The smells elicited from wet soil, plants and flowers can be great fun for kids to explore.

You can make your own gardening sensory bin with items at the dollar store or your local gardening store. You can fill with dirt, sand or beans. Give your kids a rake, shovel, recycled containers and some water-they will have fun for days!
Thursday, October 18, 2012

Contact Paper art

This is a simple little art project invitation I set up for tomorrow morning.
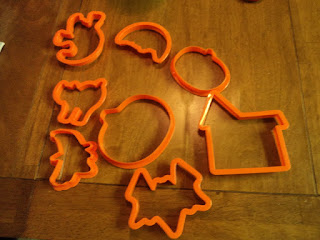
This is contact paper art. I taped contact paper sticky side up to the wall using painters tape. I used Halloween cookie cutters to draw Halloween figures on construction paper.
The idea is for the child to simply place the papers and miscellaneous leaves and flowers to the sticky paper. This is a great for toddlers or for children with special needs who may have difficulty using glue sticks/bottles.
I decorated the construction paper pieces and added a few fake leaves and flowers to the basket next to the contact paper. Finished masterpiece pictures to come :)

updated 10/24/12
Well, Grace didn't really care about putting the pictures on the sticky wall. But, she did like to explore the feeling of sticking her own hands to the wall. Instead, I put cotton balls on the wall and she liked to pull them off and put them in the basket. Like a little "cherry picking" activity.

Tuesday, October 9, 2012

DIY kitchen set

One of my favorite toys when I was a little girl was my kitchen set. I played with it for a very long time. It was simple, not a lot of bells and whistles but it entertained my sisters and I for many years!

I've been looking for a solid wood, high quality kitchen set for my daughter. But, it's just not in the budget right now. Plus, she's only 15 months so I can't really justify spending that kind of money when she's just as entertained by a box and a spoon.

I have been collecting felt, cardboard and wooden fake food over the past few months and I wanted to store it in a fun way.

DING! That light bulb went off as I looked at a cardboard box I had laying in the garage. I decided I was going to transform it into a "pantry" cabinet. Tools needed: knife, scissors, packaging tape, yarn, wooden ball beads, paper towel roll and paint or markers for decorating.

This is what it started out as:
Its hard to tell but I cut across the box horizontally to form two doors. Then I taped the bottom panel to the bottom of the doors. 
So, with the bottom panel taped this is what it looks like on the inside.

I formed the shelf using a piece of cardboard taped to the middle. Without the "support beam" it wouldn't be strong enough to hold something. I just took a paper towel roll and cut three slits at the top and bottom. Then, folded the flaps back and taped to the bottom of the shelf and bottom of the box.


Next I made the little door handles
First, I poked a small hole in the door panel using a tooth pick and pushed a piece of string through the whole then tied a knot. Second,  I laced the wooden bead through and tied it off at the other end. Lastly, I taped the back knot to the box to keep it from wiggling around too much. Repeat on the other side, make sure you line up your holes.
Once you have your doors in place you are ready to decorate. We didn't have good paint on hand and I didn't really have time to get too fancy with it. I just used a flower sponge to stamp on some painted flowers. Then I put some little boxes inside and filled them and the shelves with our fake food. I added a felt cutting board and a bottle with colored water inside.
Here is a picture of her kitchen area all set up. It includes a pantry, mini kitchen from her Grandma and her baby waiting in its highchair to be fed. I placed the mini kitchen on a sturdy cardboard crate and covered it with a blanket. This way it is a more functional height and baby G likes to climb up there to look out the window or sit and feed her baby on there. :)
This took about an hour. It was so fun :) Cant wait to see what she thinks about it in the morning!!


What toys have you made using a box??

Saturday, October 6, 2012

$6 Autumn Sensory Bin

AAA the weather is getting crispy...football, pumpkin spice lattes, sweat shirts...Its beginning to feel like fall here in southern California (despite the random days when its 90+degrees still)

I wanted to make a fun Autumn themed sensory bin as a gift for our 3year old friend. I also wanted to make one for our daughter.

I hit up the Dollar Store for some ideas. They had some shoe box sized bins with lids which I used for the gift. But, we have a great container at home for ours. Here is a picture of the supplies I bought costing in total $6
Wood chips, a small wreath, a bundle of leave, a pot of sunflower, a small pot of pumpkins/squash/pine cones, some kind of decorative branch thing (no idea what this is).

I used wire clippers to cut off the flowers, leaves, small pine cones, pumpkins and squash. I dumped the wood chips in and spread around the loot.


You can add things you find on nature walks to the bin over the next few weeks. We added two large pine cones!

These things are so great for young children. Its a way for them to explore things in nature learning about color, size, texture, weight, and smells (sometimes tastes).

Hope you enjoy!! Happy Autumn

Tuesday, October 2, 2012

DIY Light box

Here is fun way to engage your little people in a visual learning experience. Make your own light box!

To do this on a budget all you need is a plastic bin with a clear top. I used a Sterelite bin from Walmart.

I lined the inside walls of the bin with a heavy duty foil. On the inside of the lid, I taped wax paper. The wax paper acts as a light filter.

Then, I put white Christmas lights inside. You can also use the white tube lights.

 The closure on our bin snaps on the sides but allows enough room for the cord to still come out. You may need to drill a small hole to feed the cord through to the outlet depending on your bin.

Turn off the lights and. Place toys which allow light to pass through. You can work on things like building, stacking, sorting and exploring.
Be careful to watch for the heat build up inside your container....you may want to drill or poke a few holes in the back of the bin to allow some air to pass through. Do not make them too big because the light will shine through and ruin the effect. Enjoy! :)

Monday, October 1, 2012

Expectations

Today I learned a valuable lesson.

I should say, I am reminded of a lesson I've been coming to accept since having a child.

I need be mindful of my expectations and just be in the moment. This is when the magic of life happens with a child.

My story goes....I woke up with the an excited spirit for getting out and making the most of the day with my 15month old. We had breakfast, cuddles, read some books and I packed her runny nose, molar cutting little self in the car. We headed out to our local library for the toddler story/song time.

Eager parents and kids ranging from infancy to 3 years old awaited the opening of the library doors. As soon as the doors opened, the stampede ensued as everyone raced into to get prime real estate on the carpet in front of the teacher. We were lucky to get second row.

I was so excited because baby G has been showing more interest in songs and imitating a lot. I knew she would love it.

The teacher started singing with her puppets. I kept looking down at baby G, she sat there with her hand in her mouth staring in confusion. About 2 minutes into the song, she turned around, crawled out of my lap and started digging through the diaper bag trying to find some snacks. She was more interested in my car keys and a few Rice Chex then the fun spider puppet show. I was annoyed.  90% of the other kids were having fun, clapping, watching, singing along. Baby G, she was more interested in picking hair of the lady's back sitting in front of us.

She did show some interest when the teacher brought out some fake apples for a song. What can I say, my daughter likes food! She commented a few times about things she saw in the room. She was curious about the other kids and watched them in awe as they gestured and sang songs for a few short minutes.

I realized, Jamie...this is where she is at. Let your expectation go. The teacher finished and brought out toys. Baby G had a blast grabbing blocks, pushing baskets, dumping and filling containers, climbing up on the teachers chair, banging together the apples, "sharing" toys with other children, looking at a few books.

This is what its all about at her age. The sensory experience...being in a large new room with lots of loud, busy, unpredictable people. LEARNING about the social expectations of sitting and watching a teacher, following along, imitating, waiting. Why did I expect her to just know what to do on her first day?! COMMON JAMIE!

So, needless to say it was a great reminder to be patient, relish in where your child is developmentally.  Encourage and support them, but be realistic in your expectations. Use every experience as an opportunity to observe and learn about your child. Live in the moment and try to see the good in every situation. Celebrate the positive things in a situation that didn't go as YOU had planned.

Thursday, September 20, 2012

Sensory Books

I'm working with a girl on the Autism spectrum. She has some sensory processing and modulation difficulties. She also has a difficult time with communication. Her mother and I worked together and came up with a list of 15 strategies that seem to help her stay calm, focused and cope with frustrations. I wanted to share how a way we organized them so that Katie is able access to them.

We made a "Sensory Book" for home. (Ideally we will make one specific for school too).
In order to make one for your child, you will need the following items.

1) 4x6 Photos of your child engaged in the particular sensory activity
 2) A photo album ($2 Target)
3) Note cards
4) Markers/pens
 
I made this book so that Katie can use it to help communicate her needs. Because she is able to read I made sure that the language used in the book was age appropriate. I used words and labels in pictures that she was familiar with. I started the book with a brief introduction for the adults in Katie's life.
As pictures get placed into the book, a label for the activity it given on the opposite page. Then a brief description of the activity is given for the adult.
I'd like to note, every individual child has their own specific sensory needs. These needs can change depending on the environment and mood of the child. Its very important that we don't generalize sensory activities and think just because they work for one child it means they will work for others. Consulting with an occupational therapist is always best so you can determine your child's specific sensory needs.

I also thought this book would be a great idea for the child who gives you that age old phrase "I'm bored".   You could call the book "Busy Book Ideas". Document pictures of fun things your child can be doing. If they can read, write a list of supplies needed for the activity or a description of how to play the game. Having the visual cue of the activity may motivate the child to engage.

Hope you found this helpful and/or inspiring!